Recover Lost Data with QuickBooks Auto Data Recovery
In the event of data loss or corruption, an excellent feature in the QuickBooks Desktop called Auto Data Recovery (ADR) enables you to restore your crucial data. Most of the time, Intuit Data Services can assist with data recovery. However, the procedure could take some time, and you might be unable to use QuickBooks for a few days as a result.
The QuickBooks
auto data recovery can be used to restore lost or corrupted data quickly
and conveniently. Scroll through this article to know the various benefits of
this feature and the procedure to use this impressive recovery tool.
Benefits offered by the QuickBooks Auto Data Recovery (ADR)
ADR can help you in
recovering the lost file by:
•
By restoring your lost transactions using your
current Transaction Log file and your Company file, the ADR tool can assist you
in finding your lost File.
•
By using a copy of both your Company file and
your Transaction Log file, this tool can restore all transactions up until the
most recent few hours.
Steps to Recover Lost
Data from QuickBooks Auto Data Recovery
Checkout these steps to recover lost data with QuickBooks data
recovery tool:
Restoring recent transactions with the. QBW.adr file and the.TLG file
To recover all recent transactions, use the original
Transaction Log file and the ADR version of the company file.
•
Initially, you are supposed to create a new
folder named QBTest on your desktop.
•
Then, visit the Folder containing the company
file.
•
For your convenience in locating the company
file folder, you can hit the F2 or Ctrl+1 on your keyboard to bring up the
Product Information screen and the No Company Open Window. You can find the
location of the company file therein.

• Now, look in the Folder for your company file with the.tlg extension.
•
Also, you can reveal file extensions if you
can't find the.tlg file and then locate the File. For this, follow the steps
below:
•
On your keyboard, hit the Windows+E keys to
launch File Explorer. Now, head to Organize option.
•
After choosing Organize, opt for Folder and
search options.
•
For Windows 10, 8.1, and 8, you need to choose
the File name extension under View.
•
Now, the hide extensions for known file types
option needs to be chosen.
•
Subsequently hit on Apply, then pick the OK
button.
•
Copy the.tlg file from your company file that
corresponds to it and place it in the QBTest folder on your desktop.

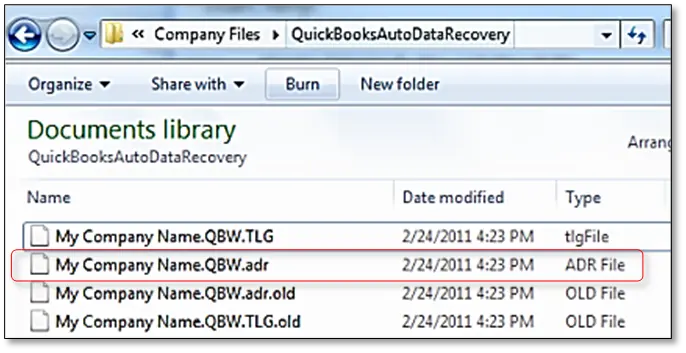
• The next step is to visit the QuickBooksAutoDataRecovery Folder. It is located in the same directory where your company file is.

• Cut and paste the. QBW.adr file into the QBTest folder. A.QBW.adr and.tlg file ought to now be present in your QBTest Folder.
•
Now, right-click the. QBW.adr file in your
QBTest folder and choose the Rename option.
• Remove the.adr file extension from the end.
•
Now, Start up the QuickBooks software.
•
This time around, you are required to open the
company file in your QBTest Folder. To ensure all transactions are present, use
your account register.
•
To verify the data integrity of the recovered
File, you need to choose File, followed by Utilities, and then hit on Verify
Data.

• If the company file copy from QBTest is unaltered, you can transfer it to the original place while moving the damaged company file to a different location.
Recover recent transactions using .QBW.adr and .TLG.adr files
Do note that this method of QuickBooks Auto Recovery
can take up to 12 hours to recover the lost data:
•
Initially, make a new folder named QBTest on
your desktop.
•
Now, locate the QuickBooksAutoDataRecovery
Folder by opening the company file folder.
•
You can tap on the F2 or Ctrl+1 on your keyboard
within QuickBooks to bring up the Product Information screen and the No Company
Open Window, where you can find the location of the company file.
•
Search for the files ending in .TLG.adr and .QBW.adr.
These files share your company file's name.
•
If you are unable to recognize the .TLG.adr and .QBW.adr
files, try showing file
extensions.
•
On your keyboard, hit Windows+E to launch File
Explorer.
•
After choosing Organize, select Folder and
search options.
•
For Windows 10, 8.1, and 8: Select File
name extension under View.
•
Hide extensions for known file types should be chosen.
•
Click Apply, then click OK.
•
Copy both the .TLG.adr and the .QBW.adr files,
then paste them into the QBTest folder.
•
Remove the.adr from the end of the file name in
your QBTest Folder. You should now have.qbw and. tlg files in your QBTest
folder as a result.
•
Now, Start up the QuickBooks software.
•
Click the company file in your QBTest folder to
open it. To ensure all transactions are present, use your account register.
•
To verify the data integrity of the recovered
File, choose File, Utilities, and then Verify Data in the upper left.
•
If this backup copy of the firm File is
accurate, you can transfer it from QBTest to the original place while moving
the damaged copy to a separate location.
We reach the conclusion of this article wherein we hope that
you can successfully recover lost data with QuickBooks Auto Data Recovery.
For further assistance, you can call our QuickBooks desktop
technical support team either via the Live chat option or by using the
helpline number i.e., 1-800-761-1787.
Also Check : https://quickbooksdesktop.bcz.com/2022/09/05/quickbooks-company-data-in-the-multi-user-mode/


Comments
Post a Comment